10.14.2009

Happy Thanksgiving (a few days late!)

Thanksgiving was a few days ago and I hope you all enjoyed the long weekend and ate a bite or two! I know did!

My boss had asked for a few samples of Thanksgiving cards that I could then produce and send to clients. I came through with the samples but forgot he was out of town the 1st week of October. Thus there was no time for final approval and most importantly, the production of 60+ cards!

These are the samples I came up with. Neither uses SU stamps.

I wanted to keep the design simple to ease the production.

The first card is Very Vanilla, Chocolate Chip, Always Artichoke, Pumpkin Pie and Close to Cocoa. The image was colored with ink and a blender pen.
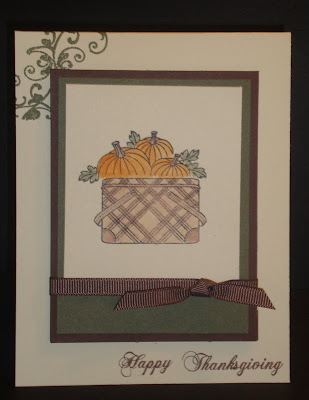


The second card is Very Vanilla, Pumpklin Pie, Old Olive, Chocolate Chip and Close to Cocoa. If this card looks familiar you may be thinking of
this card. Same layout, different card.


Well, now he's asked for Christmas cards, so I'd better make sure I get samples done and the design approved before he takes off again!

Happy Stamping!

Gigi

9.23.2009

My baby's birthday!

Its Connor's 10th birthday today! No he isn't a baby, but I could swear it wasn't that long ago that I was holding him in my arms. I think I blinked!


Here is his card. A layout I've used before (that I cased from Karrie). I love this Texturz plate (Perfect Details). I used the star from Nursery Necessities and the sentiment is from On Your Birthday. Colors are Pumpkin Pie, Very Vanilla and of course, Chocolate Chip. I finished it off with a few Pumpkin Pie brads. I don't use colored brads very often but they suited this card well.

He is such a sweetheart and I really don't know where the time has gone!

Happy stamping!

Gigi

9.16.2009

More MDS


I am loving it!

Today's page was made from scratch. This means I started with a white page with a photo layout and added each detail separately. This took me about an hour.

Here's how I did it:


  • choose the background color (Baja Blue)


  • added the Chocolate piece behind the photos

  • dropped the photos

  • added punches circles - here I added one then resized and colored it then copied and pasted, then I added two more each time repeating the sizing and coloring process

  • added the 'torn edge' stamp - this is the blue swirly at the bottom - it is a stamp that I stamped then colored and sized

  • added the text boxes, formatted the text to the type, color and size I wanted


  • added the brackets (love those)

  • the final detail was to add the white stitching on the Chocolate Chip piece

Too fun! Hope you enjoy!

Gigi

9.14.2009

Its here!

My Digital Studio that is! This is so much fun! I used the Summer Home kit. I added the text box (that you can't really see in the photo, its under the photo on the first page) and photos and moved some of the embellishments around a bit, but really just used the layout the way it was. This is so easy and fun!!


I am sure I'll have more to share with you soon!


Although these pages were easy to create it was much more difficult trying to get them side by side on my blog! Sorry, I just couldn't figure it out! My Digital Studio is much easier than blogger!!!


Gigi


Season of Friendship


Today I am revealing the Season of Friendship class project. The class is a boxed set of these 4 cards. (I will show you the box later. )

I love the jewel tones of these cards. My initial plan was to avoid representing the 4 season, (since its been done many times by many stampers, myself included) but in the end these colors called to me and they each "felt" like Spring, Summer, Winter and Fall.


The Flourish Texturz plate is used on each card as well as a sentiment from Teeny Tiny Wishes.

This class is being held October 24 at 1PM. I hope you can join us!


Happy Stamping

Gigi


9.13.2009

Scrapping with the Mini


I made these Christmas scrapbook pages with DSP from the new mini and the Merry Details Sizzlet. My base is 12x12 Textured Real Red. The base squares are Kraft layered with Soft Suede. Then I randomly placed either a photo from a Christmas past or a piece of Christmas Cocoa DSP (okay it wasn't so random, I spent some time moving the squares around until I was pleased with the final look). The giant snowflake pieces are flocked! They are so pretty! I added a couple of the birds cut with the Merry Details Sizzlet. Its a great little Sizzlet that adds a touch of - for lack of a better word - detail to projects. The letters were cut using my Timesless Type Sizzlets.

Happy Stamping (and scrapping)!

Gigi
Posted by Picasa

9.07.2009

Charming

Charming is a stamp set from the new SU mini. It is the set that corresponds to the new charm jewelery; I haven't ordered the charms (not really my thing) but I really like the stamp set!

This card is a Very Vanilla base topped with a layer of Rich Razzleberry. I then ran a piece of Chocolate Chip through the Big Shot with the Perfect Details Texturz plate. This Chocolate piece and a piece of Old Olive top the Razzleberry.

The image is actually 3 of the stamps from the set. I first stamped the background in Chocolate Chip. Next I used my Old Olive and Rich Razzleberry markers directly on the rubber on the stem and flower image. Finally, I added that little butterfly. I suppose a sentiment could be added to the top right of the card, but I kind of like the simplicity of it (and it can be used for any occasion!).

And of course a piece of my favorite ribbon, 5/8" grosgrain, finishes off the card.
Happy Stamping!
Gigi
Edited to add: Forgot to mention that this layout and color combo was totally cased from a card I saw online. Sorry I can't recall whose blog it was!
Posted by Picasa