12.03.2009

Pink Cupcakes


Love this stamp set (Crazy For Cupcakes). I tend to use these colors (Regal Rose, Pink Pirouette and Sweet Always DSP - this was my LAST scrap of Sweet Always, loved that paper!) alot with this stamp and you've seen this combo before. This time I did that sort of new and trendy thing with the ribbon and added some doodling and a button with some bling to the image panel.


Happy Stamping!


GigiPosted by Picasa

12.01.2009

Happy Holidays


Well I have to say that I am so happy these aren't real snowmen! Its the end of November and we've had barely a skiff of know. I am so thankful for this glorious weather!


This card is totally CASED from a card I did about 5 years ago in Karrie's marker club. I switched out Flaky Friends and used the snowmen from the Level 3 set The More the Merrier. I made the card a 4-1/4" square layering Brocade Blue and Basic Black. Once again used a Texturz plate (SU Backgrounds 1). Sentiment is from Four The Holidays.


Love these little guys - they are so cute!


Happy Stamping!


Gigi


Posted by Picasa

11.28.2009

Peace on Earth CASE

Totally cased this card from someone someplace in the cyber world. Sorry I don't remember who or where, but suffice it to say, that I totally copied this one.

A Rich Razzleberry 6x3 base with a layer of Old Olive. The snowflake is from Patterned Pines (Level 1 Hostess in the mini) and is stamped in Bermuda Bay, Old Olive and Rich Razzleberry. The sentiment (Four The Holidays) is stamped with Bermuda Bay. The ribbon is retired Old Olive twill. I added tiny rhinestones to the centre of each flake with Tombow Multi Purpose Adhesive.

I really like these colors together - not sure if I would've thought to put them together on my own!

Happy Stamping!

Gigi
Posted by Picasa

11.11.2009

Club Project

This little project is one my club girls will be doing this week. I am loving this little wall hanging. If you are a demo you may recognize it from our October SS.

I cut the bases out of On Board Book Basics chipboard with the Bigz Clear Scallop Square Die. I then used the same die to do the Chocolate Chip. Then added a layer of Old Olive that had been run throught my BigShot with a Texturz plate. The letters (Serif Essentials Alpha) were also done with On Board chipboard along with Real Red cardstock.

I added the snowflake and the holly (stamped on a scrap of Whisper White and cut out, stamp is from Christmas Classics) and a few tiny rhinestones for a hit of bling!

I used Tombow Multi Purpose Adhesive to stick the whole thing together.


Happy Stamping!

Gigi
Posted by Picasa

10.18.2009

Mini Christmas Album

This is a little mini album made with the I Wish (retired) Simply Scrappin Kit. I have bits and pieces of this kit leftover from last year and this little project put them to great use!

I found the tutorial on Corinne Summerville's blog. This woman has lots of enthusiasm for stamping and she is pretty excited sharing this project! Be prepared for her "knock your socks off" tutorial.

I added the belly band (I LOVE belly bands) but other than that I just followed the simple instructions.

This little album would make a cute (and quick) gift for many occasions.

Enjoy!

Gigi


10.16.2009

Downline Meeting

My upline is having a downline meeting this Friday. I am looking forward to it as I had to miss the last one and its always a fun evening of creating, gabbing and munching!

I am in charge of creating a make 'n take. I came up with this gift card holder. I am still not 100% sure this will be my final project. If you know me at all then you know I work best under pressure and will probably get inspired after work on Friday and whip something entirely different up for the meeting at 7pm!

This is a 4-1/4" by 11" piece of Brocade Blue cardstock that has been scored at 3-1/4", 5" and 7-3/4". The centre score is a mountain fold and the two end scores become valleys. The centre portion is adhered on its backside with sticky strip (but NOT on the fold side). On the fold side of the centre portion, I used my word window punch about 1/2" in from both the top and bottom and then my 1-1/4" circle punch in the centre of the punched word window. Make sense? This creates the pocket for the gift card.


The front started with a piece of Brocade ribbon then was layered with Very Vanilla and Bashful Blue. The blue was run through my Big Shot with the Perfect Details Texturz plate. This image from Tree Trimings was first stamped in Brocade Blue on a piece of Very Vanilla which was then layered on Brocade Blue. The ornament was again inked up in Brocade and I used a sponge dauber to apply some Champagne Mist Shimmer Paint to the rubber (yes, right on top of the ink). This image was then cut out and adhered with dimensionals.

This is one of my favorite ways to package a gift card.

Happy Stamping!

Gigi

10.14.2009

Happy Thanksgiving (a few days late!)

Thanksgiving was a few days ago and I hope you all enjoyed the long weekend and ate a bite or two! I know did!

My boss had asked for a few samples of Thanksgiving cards that I could then produce and send to clients. I came through with the samples but forgot he was out of town the 1st week of October. Thus there was no time for final approval and most importantly, the production of 60+ cards!

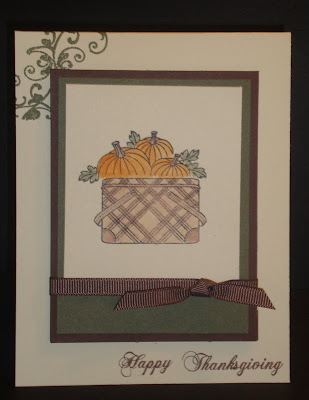
These are the samples I came up with. Neither uses SU stamps.

I wanted to keep the design simple to ease the production.

The first card is Very Vanilla, Chocolate Chip, Always Artichoke, Pumpkin Pie and Close to Cocoa. The image was colored with ink and a blender pen.


The second card is Very Vanilla, Pumpklin Pie, Old Olive, Chocolate Chip and Close to Cocoa. If this card looks familiar you may be thinking of
this card. Same layout, different card.


Well, now he's asked for Christmas cards, so I'd better make sure I get samples done and the design approved before he takes off again!

Happy Stamping!

Gigi